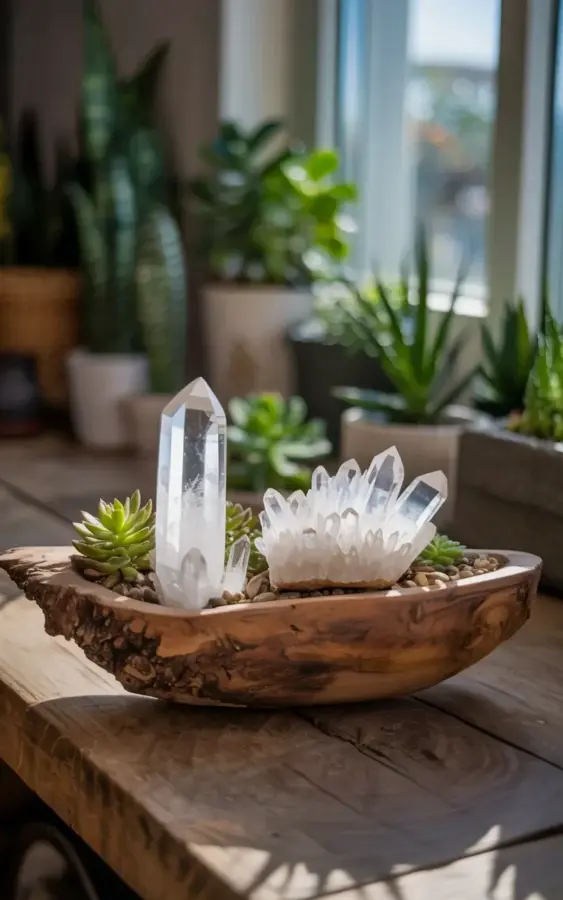
At the corner of my shelf, just under the window, there’s a little patch of wood and crystal that I walk past at least ten times a day. Every single time, I stop. A crystal centerpiece like this one sounds fussy until you actually put it together, and then it just sits there looking completely natural, like a tiny piece of landscape that wandered indoors. The bowl is plain, the quartz points are not museum-grade, and the succulents are the kind that cost four dollars at the grocery store. Together, they changed the whole shelf in less than five minutes.
Scoring a Driftwood Bowl Without Spending Real Money
Real driftwood bowls are everywhere if you stop looking in the wrong places. The fancy ones at home goods stores run anywhere from 30 to 80 dollars, which is honestly silly. Check the beach first if you live near water, just inside the tide line after a storm. I found my own bowl in a secondhand shop for six dollars. It has rough, weathered edges, a rich brown color that no stain could fake, and a few tiny worm holes that nobody notices until I point them out.
Not near a coast? Look for wooden salad bowls at thrift stores that are already beat up, the kind with visible grain and a slightly uneven rim. Sand them lightly, oil them once, and they read as driftwood from across the room. Even a flat piece of bark can work, though it needs to have any rim at all to keep the succulents from rolling off. The texture matters more than the exact shape. You want something that feels like it was found, not manufactured.
Picking Quartz Points That Look Expensive (But Aren’t)
Clear quartz is the most common crystal on the planet, and that works hugely in your favor. A single tall, terminated point can cost as little as 8 to 12 dollars at a rock shop, and if you buy a small cluster instead, drop that number even lower. The piece in this photo has one larger point standing up and a second formation clustered beside it. That combination, one vertical and one low, is what gives the bowl its height and its grounding at the same time.
Here’s the thing: you don’t need perfect clarity. The quartz with a bit of clouding, a few internal cracks, even a tiny chip on the termination point, those are the ones dealers sell cheaper, and they catch light just as well. My own cluster has a small ding on one side and I honestly like it better that way. It looks like it was pulled from the ground rather than polished for a gift shop. Look for points that are roughly the same width as two fingers and have at least one sharp crown. Beyond that, just pick the one your eye keeps going back to.
Tiny Succulents: the Cheapest Part of This Whole Setup
People overcomplicate this, ok so let me simplify. You do not need rare plants. You need two or three tiny succulents that you will gently rest in the bowl, not plant in it. This is the budget secret. Because the succulents are not in soil inside the bowl, you can buy the smallest starter pots at a garden center for 3 or 4 dollars each and then reuse them for other projects later or even root them in a separate pot.
– Small echeveria rosettes are the classic choice, they hold their shape and stay tiny.
– A sprig of sedum with tight little leaves gives a trailing texture near the rim.
– Honestly, a single sprig of any succulent you already own will work. I once used a broken leaf that had rooted in a windowsill pot.
The trick is to keep their root balls slightly wrapped or just tucked into the crevices between the crystals so they stay put. They don’t need water while they’re on display, and they can live like that for a week or two before they want to go back into real soil.
Assembling the Crystal Centerpiece So It Lasts
Put the tall quartz point in the center first. That is your anchor. Then angle the clustered formation beside it, close enough that the two touch at the base, because that looks deliberate. Pack the succulents around the bottom edges, pressing their little root balls into the gaps between the crystals and the rough wood of the bowl. The whole thing should feel naturally settled, like it grew there, not like someone arranged it with tweezers.
If you’re worried about stability, a pinch of soft moss under the quartz bases will hold them steady without being visible. On a flat shelf, I almost never need it. The weight of the succulents against the crystal bases is usually enough to keep everything upright. And the beauty of this design is that nothing is glued or permanently fixed, so you can swap the plants out whenever they start to look tired. That gives you a centerpiece that changes with the seasons for free.
Window Placement and the Science of That Sparkle
The photo shows a window in the background, and I want to be really clear about this: the window is doing half the work. Clear quartz points sparkle best when light hits them from the side rather than straight overhead. Without realizing it, you probably already have a spot in your home where afternoon light glides across a shelf for an hour or two. That is where this belongs. Set the bowl there and step back at different times of day. Morning at my place gives a soft, warm glow, but late afternoon makes the internal fractures of the quartz light up like tiny silver threads.
Do not put it directly in bright direct sun for hours on end. The succulents will start looking unhappy and the glue holding any broken pieces of quartz together may soften. A couple of feet to the side of a bright window is perfect. The crystals still catch the light, the plants stay comfortable, and the bowl takes on a certain glow in the darker months that simply stops me mid-task.
Where to Put It, and What to Skip
This particular bowl is on a shelf, which is the easiest place for most people. But I’ve also seen the same exact lineup work on a dining table center, a bathroom counter by a south-facing window, even a sturdy wooden desk where the quartz points act as natural paperweights. The driftwood lends an earthy tone wherever it goes, so it does not need a fancy background. Plain white walls, unpainted wood shelves, or even a slate tile backsplash all let the natural textures take center stage.
What I skip is anything too styled in a gallery-wall way. If the shelf has a dozen other decorative plates and tiny vases, the bowl will get lost. Give it a little breathing room, maybe one stack of books beside it and nothing else. And don’t add artificial greenery. Real succulents, real wood, real stone, those three carry the whole look. Anything shiny or metallic in the same frame will quietly ruin the honest, earthy mood.
Same Bowl, Three Other Personalities
Once you have the driftwood bowl, you will realize it is a stage, and the centerpiece can change with your mood or the weather. In the middle of summer, I swap the succulents for a few small white pebbles and a single large quartz point that catches the evening light. In the fall, dried orange slices and a small amber stone give the bowl a warm, cinnamon-toned presence. Around winter holidays, I drop in a few tiny sprigs of pine from a walk outside and let the quartz point do the rest.
This is also how you justify the cost of a nice bowl, if you did end up paying a bit more. One good piece of driftwood can host a rotating cast of inexpensive things for years. Honestly, the only rule is that whatever goes in the bowl should feel natural next to the quartz points. The sparkle of the crystals forgives almost anything else.
Make Your Own in the Next Ten Minutes
There is no waiting period and no special skill required here. A thrifted bowl, a quartz point or two, whatever tiny plants are already around your house, and a spot near some natural light. That is the whole recipe. My version cost under fifteen dollars all in, and it still looks like something from a design catalog. Not bad for a shelf that used to hold a dusty stack of old notebooks and an orphaned candle.
If you decide to build your own, I genuinely want to know how it turns out. The fun is in the small differences, the shape of your found wood, the way your particular window light hits the quartz at 4 p.m. Come tell me what you used and where you put it. And take a picture while the light is good. Save it, because this is one of those rare decor projects that photographs exactly the way it looks in person.
Leave a Comment