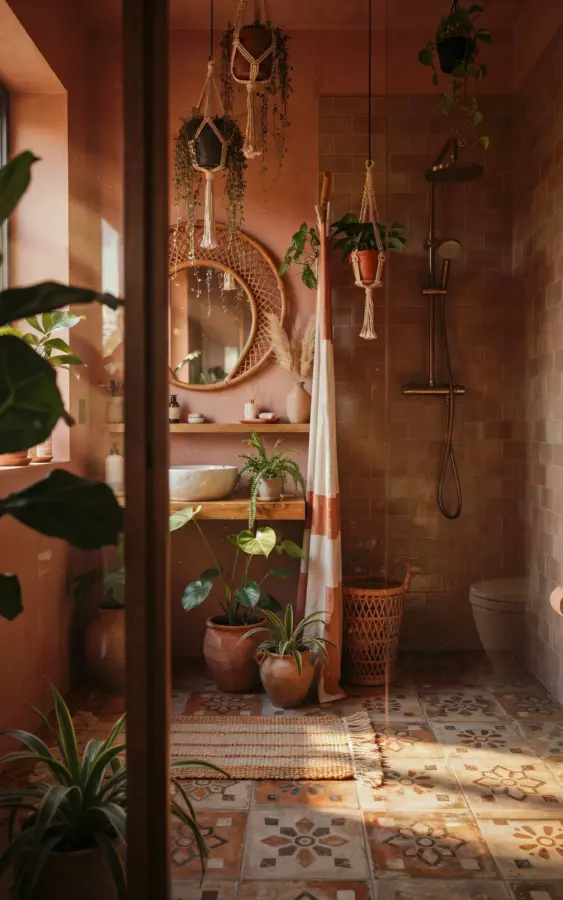
I honestly couldn’t believe the difference when we finished our boho bathroom makeover. Our rental bathroom was a beige box with a weirdly low sink and tile that looked like it came from a 1998 hotel lobby. We kept the old tile, but we added rattan shelves, a macrame planter, and swapped the giant, foggy mirror for a round wooden one. It’s amazing what a few thrifted finds can do, and I’m going to tell you exactly how we pulled it off without losing our security deposit.
Why a Boho Bathroom Refresh Works for Renters
Look, I love a good gut renovation as much as the next person. But not all of us own our homes, and not all of us have two grand to drop on new tile. That’s why temporary, low-impact changes are the real star of the show here.
Bohemian style is forgiving. It’s collected, layered, and a little bit messy, which means it hides a multitude of rental sins. You can lean into natural materials and textiles to draw the eye away from dated fixtures. Think of it as styling, not renovating.
The best part? When you move out, everything comes down with a screwdriver and some spackle. No demo, no dumpster, no angry landlord.
Small Bathroom Decor Ideas That Make a Big Impact
Our bathroom is genuinely tiny. Like, you can sit on the toilet and wash your hands at the same time, kind of tiny. So we had to be smart about every single piece we brought in.
Scale is your best friend here. A giant plantation shutter or a heavy wooden cabinet would have swallowed the room whole. Instead, we went with a narrow, three-tier rattan shelf that fits in the corner next to the sink. It holds our towels, a small jar of cotton balls, and a tiny succulent.
Here’s what we focused on:
- A round mirror to soften all the sharp angles and reflect light
- Floating shelves in a light wood tone to add storage without bulk
- One big, trailing plant in a macrame hanger (a golden pothos, super easy to keep alive)
- Baskets. Oh my gosh, baskets fix everything. A woven basket hides toilet paper and extra shampoo bottles in plain sight.
Every item has a job. If it didn’t do a job, it didn’t get to stay.
Before the Makeover: Taming the Rental Ugly
Let me paint you a picture. The walls were a shade of tan that I can only describe as “landlord beige.” The mirror was one of those huge, framed rectangles that was permanently attached to the wall with construction adhesive. The light fixture was a brass dome thing that looked like an upside-down cereal bowl.
We couldn’t change the vanity or the countertop. We couldn’t rip up the vinyl floor. For a while, I honestly felt stuck, like the room was ugly and there was nothing I could do about it. I kept closing the door and pretending it didn’t exist.
Then I realized we just had to change the focal points. If you can’t fix the floor, you fix the ceiling. If you can’t change the cabinet, you change the mirror above it.
We asked our landlord if we could swap the mirror. He said yes, as long as we kept the old one in the basement. That was all the permission we needed.
No-Damage Bathroom Updates: The How-To
Ok so, here’s the tricky part. How do you hang shelves and a heavy mirror when you can’t drill into tile? The answer is a little bit of patience and a lot of command strips.
First, we took down the old mirror. It was heavy, so this was a two-person job, not gonna lie. We had to use a pry bar to get it off the wall, and it left some nasty chunks in the drywall. But hey, that’s what a tube of spackle is for.
For the new wood mirror, we used a heavy-duty picture hanger rated for 50 pounds. We found a stud, marked it, and used a regular screw. It took about ten minutes.
The rattan shelves were lighter, so we used adhesive mounting strips. Here’s the thing about those strips: they only work if the wall is super clean. Wipe it down with rubbing alcohol first, press the strip on, and wait an hour before you hang anything. If you rush it, they will fall and break your favorite mug. I learned that the hard way in a different apartment.
Thrifted Finds and Budget Boho Bathroom Accessories
The whole look came together for under a hundred bucks. The mirror was a Facebook Marketplace find for $25. The rattan shelf was from a garage sale, and honestly, I think the lady just wanted it gone because she asked for $5.
We bought the macrame planter from a local craft fair. That was probably the most expensive single item at $30, but you could easily make one or find one at a thrift store for a few dollars. Hot tip: check the yarn section of Goodwill, people donate half-finished macrame projects all the time.
Other cheap wins:
- A bamboo soap dish from Target, like $3
- Glass apothecary jars from the thrift store, filled with Epsom salts and cotton swabs
- An old wooden stool we spray-painted white to hold a stack of clean towels
- A small watercolor print from Etsy, framed in a chunky wooden frame
We didn’t buy a single brand-new decor item from a big box store. Looking at the room now, you’d think we had it professionally designed, but it’s literally just a bunch of mismatched stuff that happens to look good together. The secret is sticking to a natural color palette. If everything is wood, white, and cream, it doesn’t have to match perfectly.
How to Style a Bathroom with Plants and Rattan
I am not a plant person. I have killed every cactus that has ever come into my home. But my golden pothos has survived for eight months, and that’s basically a miracle.
The key is to hang the pothos high, out of the way, so you don’t knock it over when you’re reaching for a towel. Macrame planters are perfect for this because they’re pretty, but also because they keep the plant contained. You can get a plastic liner with a hook, drop it in, and hang it from a ceiling hook (which you can patch up later).
For the rattan, think texture. Rattan isn’t just about the color, it’s about the weave. The little gaps in the shelf create shadows that make the wall look more interesting. If you can’t install shelves, lean a woven ladder against the wall.
And if you’re worried about moisture, don’t be. We kept the rattan shelf away from the shower splash zone, and we put a little felt pad under the bottom to keep it from scratching the vanity. It’s held up through a whole Florida summer of humidity with zero warping.
Round Wood Mirror: The Game Changer
If I had to choose one element that made the biggest difference, it would be that round wooden mirror. The old rectangle mirror was making the room feel squat and boxy. The round shape tricks your eye into thinking the space is taller.
It also ties in the natural wood tone from the shelves and the stool. You don’t need everything to be the exact same color, but they should feel like they’re in the same family. Our mirror is a dark walnut, the shelves are a light oak, and the stool is painted white. It sounds like it shouldn’t work, but it does. The warm tones bounce off each other.
I also swapped out the brass dome light fixture. I couldn’t replace the whole thing, but I unscrewed the dome, spray-painted it black, and put it back up. Total cost: $1.29 for a can of spray paint. It took 15 minutes to dry.
That little change alone made the room feel ten times more modern.
Anyway, the whole project took a weekend, but most of that was waiting for paint and adhesive to dry. The actual work was maybe four hours, all told. It completely changed how I feel about that room. I used to dread going in there, and now I leave the door open just to look at it while I walk past.
If you’re stuck in a rental that you hate, or even if you own a house that just feels blah, start small. Change one mirror. Move one plant. Hang one shelf. You don’t have to see the whole finished picture right away.
I’d love to know what thrifted treasures you’re working with in your bathroom right now. Let me know in the comments, and don’t forget to pin this for later if you need a little boho bathroom inspiration for your own refresh.
#bohobathroom #bathroommakeover #beforeandafter #smallbathroomdecor #bohemianstyle
Leave a Comment